
According to Apple, over 650 million people go to App Store to discover and download apps every week. However, there are also millions of apps in the app store. So as you can imagine, there can be a bunch of apps that offer the same services as yours.
In this situation, how to stand out from your competitors and get more exposure to potential users? There are at least three things you can work on:
- First of all, make sure to build a valuable app that can help users solve their problems.
- Secondly, you need to rank your apps ahead of your competitors. Here are some app store optimization strategies to start with.
- The last one is to promote your ios apps using Apple Search Ads, a potent marketing channel to acquire ios users.
In today’s article, we are going to focus on the last one and talk about how to promote your subscription apps with Apple Search Ads with a step-by-step guide.
Before moving on, make sure you are acquainted with an overview of Apple Seach Ads.
Get Started with Apple Search Ads
Whether you plan to promote your apps using Apple Search Ads Basic or Apple Search Ads Advanced, the very first thing you need to do to get started with Apple Search Ads is to set up an account. Let’s do it now:
Step 1: Decide on using Apple Seach Ads Basic or Advanced.
In general, if you don’t have much time and energy managing Ads campaigns, the Basic solution is a good choice to start with. If you are an app marketer, advertiser, or growth manager, you may want to go with the Advanced solution.
Once you decide on which solution to begin with, click one of the following sign-up links and move on:
Step 2: Log in
Log in with the Apple ID associated with your App Store Connect account. Note that you cannot promote apps that are not associated with your linked App Store Connect Account.
Step 3: Customize your account setting
Once you log in with your Apple ID, an account customization window will pop out. You can choose the language and format preferences for your account. Click “Continue” to the sign-up pages.
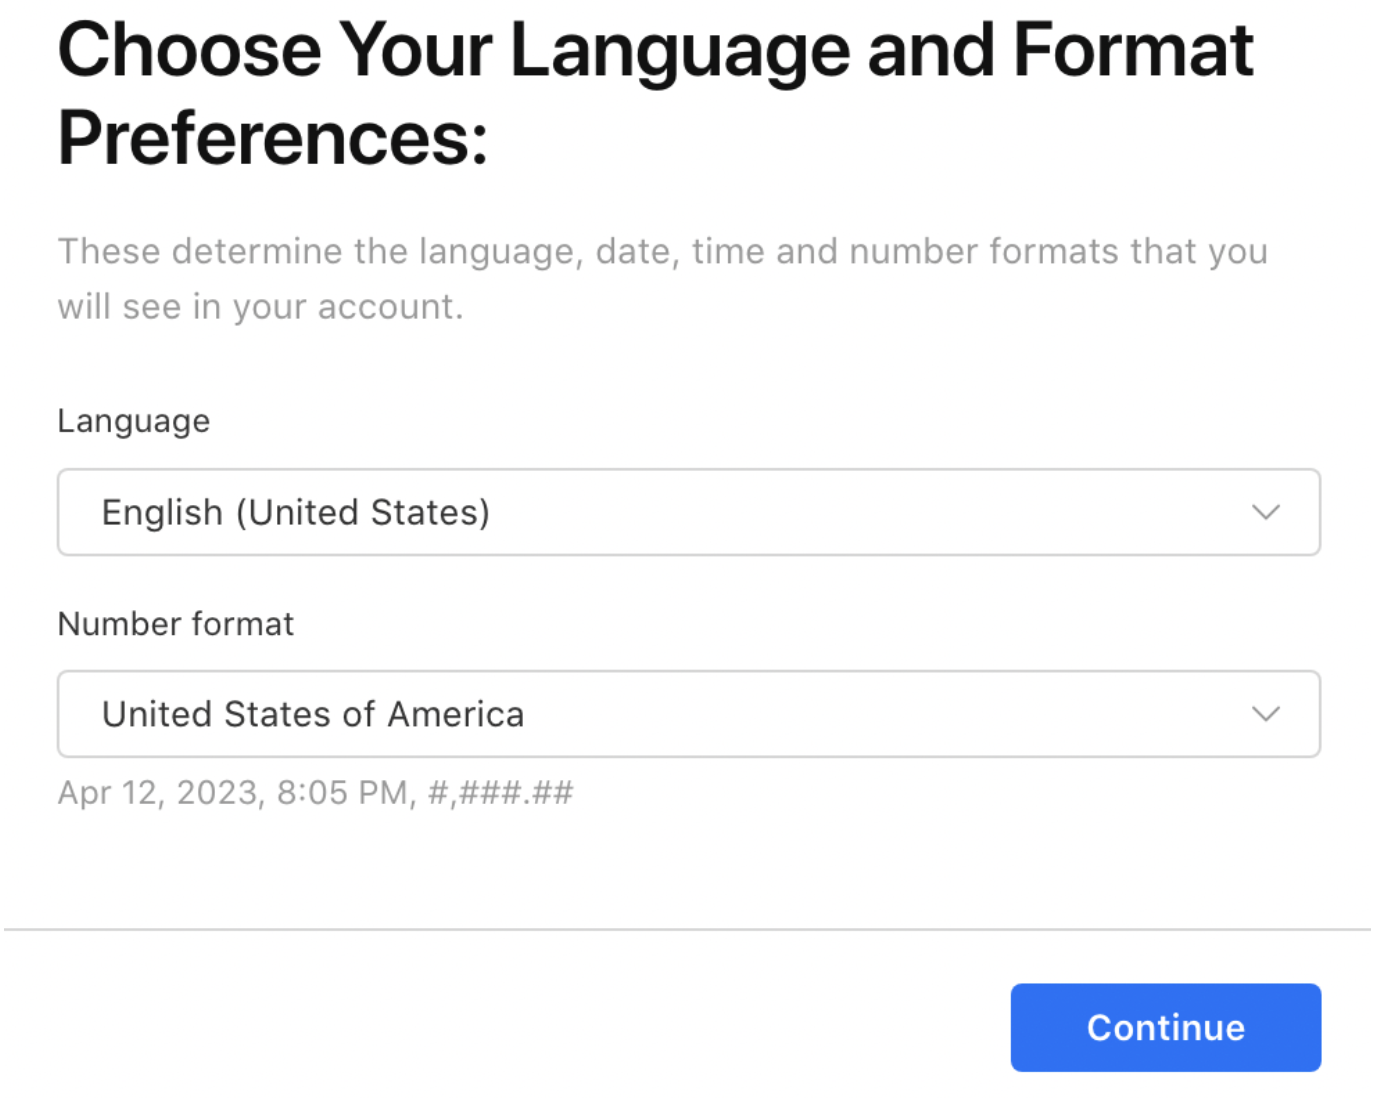
Apple-Search-Ads-account-preference
Step 4: Sign up
Fill in account settings and business information:
- Account name
- Country or region
- The currency you wish to pay in (You cannot change once it is set)
- Time zone ((You cannot change once it is set)
- Legal entity name
- Whether you’re acting as an agent
- The primary contact (you can add another user later)
- Your email notifications preference
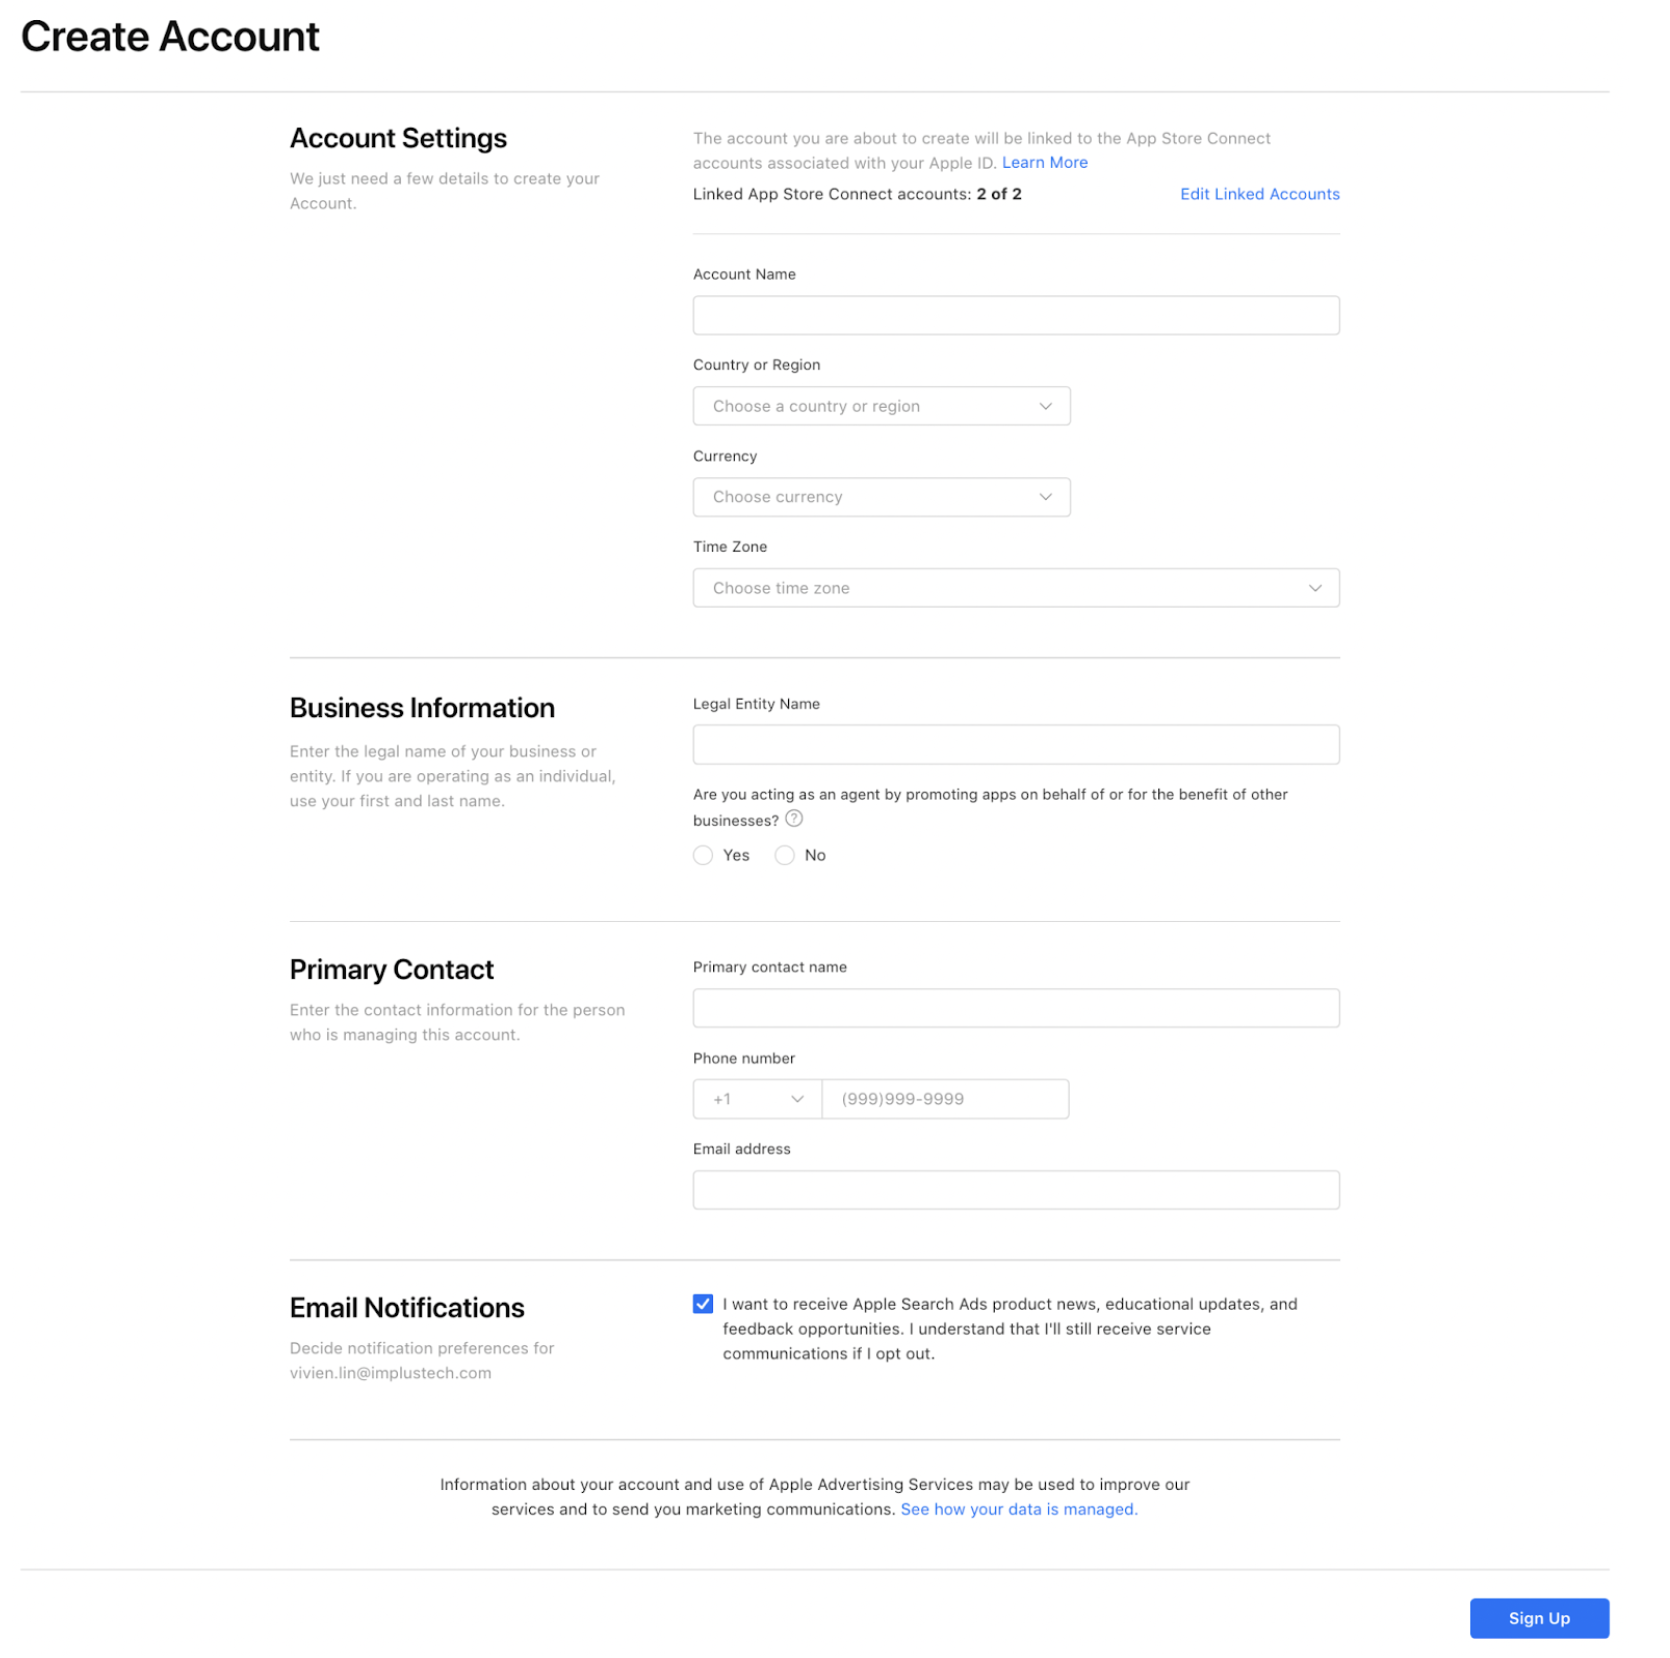
Apple-Search-Ads-sign-up-form
Step 5: Complete the business details
After clicking the “Sign Up” button on the bottom right of the form, you will be directed to the business details page.
You need to fill in the key information about your company: Legal entity name, Business entity status, Tax ID, Address, etc.
Note: the information you fill in will determine your tax status.
Step 6: Set up a payment method
You need to set up a valid payment method before you can run Apple Search Ads.
Once you set up the payment method, your account is ready and you can move to the next step—Promote your subscription apps using Apple Search Ads.
Checklist Before Creating Apple Search Ads Campaign
Before running your Apple search ads, or creating your first ad campaign, here is a checklist guiding you in the right direction:
- Make sure your Apple ID is associated with your App Store Connect Account
- Check whether the app you want to promote is live on the App Store. Note that the app should also be in the same App Store Connect Account linked to your Apple ID.
- Decide on what countries and regions to promote your apps
- Figure out where to put your ads if you plan to go with Apple Search Ads Advanced.
Note: there are four places you can put your ads: the App Store Today tab, the App Store Search tab, App Store search results, or product pages while people are browsing apps. However, only search results ads are available in mainland China.
If you plan to go with Apple Search Ads Basic, the ads are only displayed on app store search results. So you can skip this step. - Work on your ads budget allocation and know how much you can spend
- Have a valid payment in your Apple Search Ads account
After confirming you have got the above preparations ready, let's start creating the first ads campaign. We will talk about how to set up Apple Search Ads Basic and Advanced respectively. Let’s go with Apple Search Ads Basic first.
If you want to start Apple Search Ads Advanced right away, click here to see the step-by-step guide.
Step-by-step Guide to Set up Apple Search Ads Basic
Apple Search Ads Basic is actually easy to set up. It is suitable for indie developers or app entrepreneurs who want to run ads but lack time and energy because they have to focus on app development.
You need to just set the goal: places to advertise, monthly budget and maximum cost-per-install (the amount of money you would pay for each app installation). Apple will then match your ads with potential app users and maximize your result.
Here is a step-by-step guide to setting up Apple Search Ads:
Step 1: Log in
Log in to your Apple Search Ads Account using your Apple ID that is linked to the App Store Connect account where the app you want to promote lies.

Apple Search Ads Basic Dashboard(source: Apple)
Step 2: Choose the app you want to promote
When you reach the account dashboard, choose the app you want to promote. If you want to promote more than one app(up to 50 apps), you have to set the ads for each app respectively.
Step 3: Choose places to advertise
After choosing the app you want to promote, the next step is to choose in what countries or regions you would like to advertise. You can either choose all the places available or select several places your app targets.
Step 4: Set up a monthly budget
The monthly budget is the maximum amount of money you are willing to spend on promoting your apps every calendar month across all the places your ads will run. You can set the amount up to $10,000(U.S.) per app.
Step 5: Decide on the max CPI
You decide the maximum money you are willing to spend for each installation and you pay for it. Apple will suggest a max CPI(cost-per-install), which you can accept or set your own.
It is suggested that you set the suggested max CPI and adjust it according to the ad's performance later.
Once you make your decisions, click “Save” and the Apple Search Ad will start running right away.
Note: If you don’t want your ads to run at the moment you set it up, you should pause it manually at the dashboard. Or it will start immediately.
Apple Search Ads Basic Report
After you set the campaign up following the above step, your ads will run automatically(of course it is when Apple finds a valid payment method in your account).
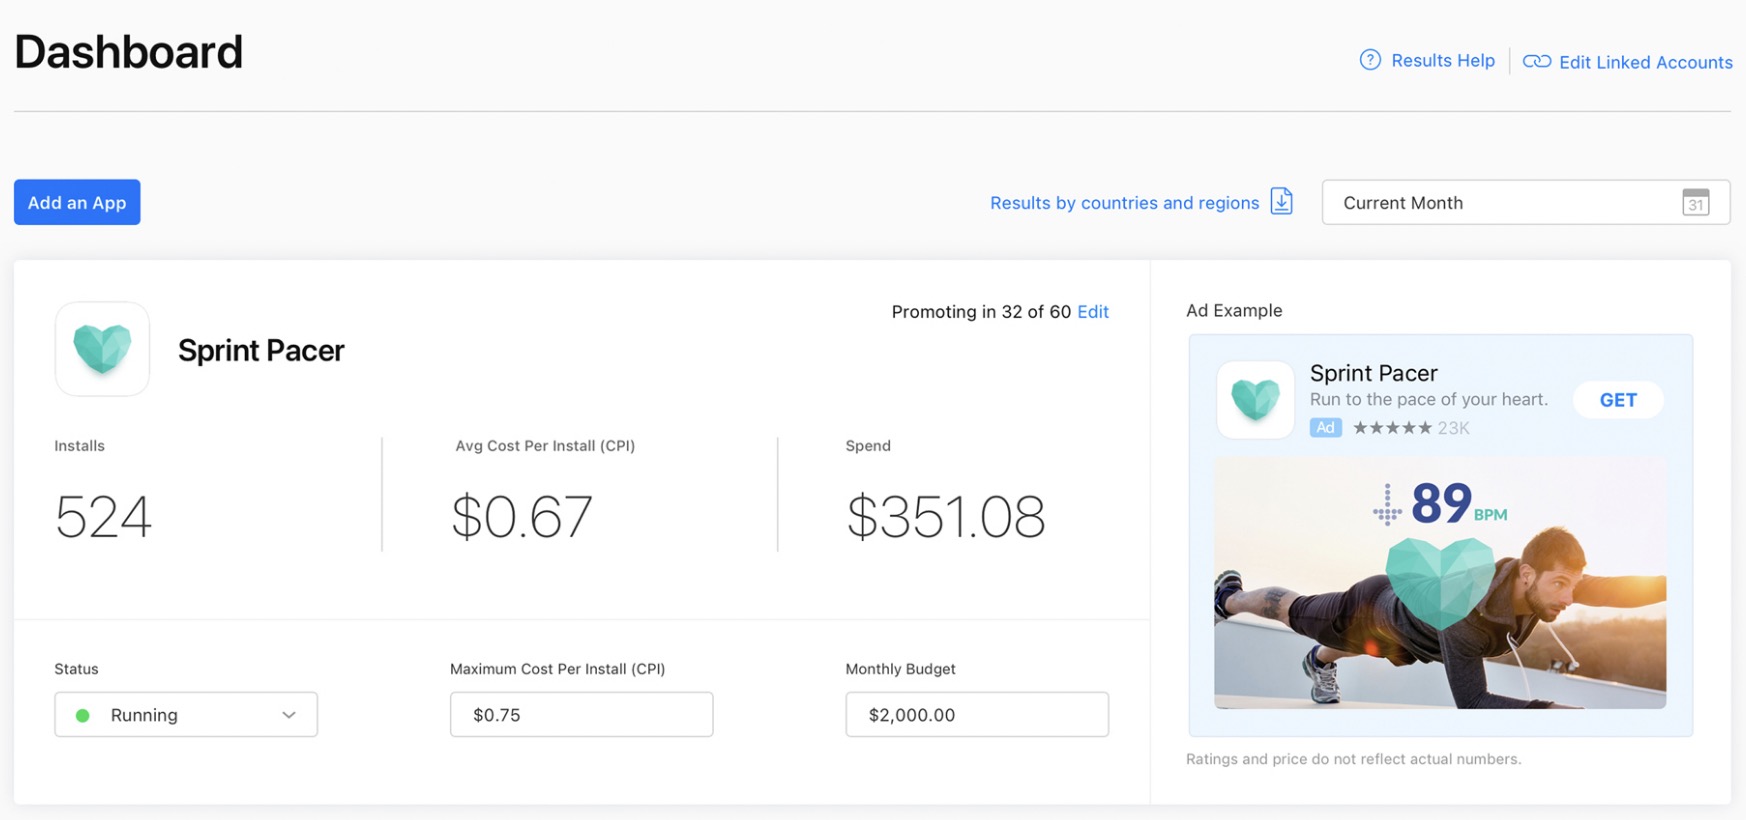
apple-search-ads-basic-reports(source: Apple)
When your ads get running, you can see how your ads are performing in the dashboard. Metrics available are:
- Installs: total number of downloads and redownloads of your app onto user devices that occur within a 30-day conversion window.
- Average Cost-Per-Install (CPI): the total spend divided by the total number of installs in a chosen period
- Spend: the amount of money spent in a certain time frame.
- Status: the current state of your ads(there are three states: Running, Paused, or On Hold—mainly when your credit card is declined, you reach the monthly budget or violate the policy.
- Maximum Cost-Per-Install (Max CPI): the maximum amount of money you are willing to pay for a download of your app.
- Monthly Budget: The most you want to spend every calendar month
You can then adjust the max CPI according to the performance report and optimize it further.
Pro Tip: Tracking Post-install Events for Apple Search Ads Basic
Apple is not able to track the post-install events for you. So you will not be able to know the true value the ads can bring you.
For example, if your app is monetized by subscriptions, the true value the app brings you should be increasing subscriptions. But Apple Search Ads report does not offer to track whether users installing the app subscribe or not.
That’s why Apple suggests using MMPs(Mobile Measurement Providers) if you want to track the post-install events. Appflow.ai is one of the MMPs for subscription apps to attribute post-install events.
It is the best free mobile subscription analytics platform to help clarify whether the Apple Search Ads are actually bringing in value for you or you are just wasting your money.
Related reading: how to track ASA post-install performance.
post-install-events-tracking(source: Appflow.ai)
The above are the step-by-step guides on setting up Apple Search Ads Basic and how you can track the performance and the true value of the ads.
Now you may wonder how are things going with Apple Search Ads Advanced. Let's dive into it.
Step-by-step Guide to Set up Apple Search Ads Advanced
Apple Search Ads Advanced is a powerful marketing tool to meet app revenue goals. It is popular among app developers, app advertisers, app marketers and app growth managers.
You will have all the control over the ads placement in App Store, countries and regions, audiences, keywords, devices, and so on.
You pay the ads in a CPT(cost-per-tap) model. You will need to set up a max CPT bid. Note that the actual amount you’ll pay will not exceed the max CPT you set and is based on what your next closest bidder is willing to pay.
Now let’s set up the first campaign step by step together.
Step 1: Log in
Log in to your Apple Search Ads Account using your Apple ID that is linked to the App Store Connect account where the app you want to promote runs.
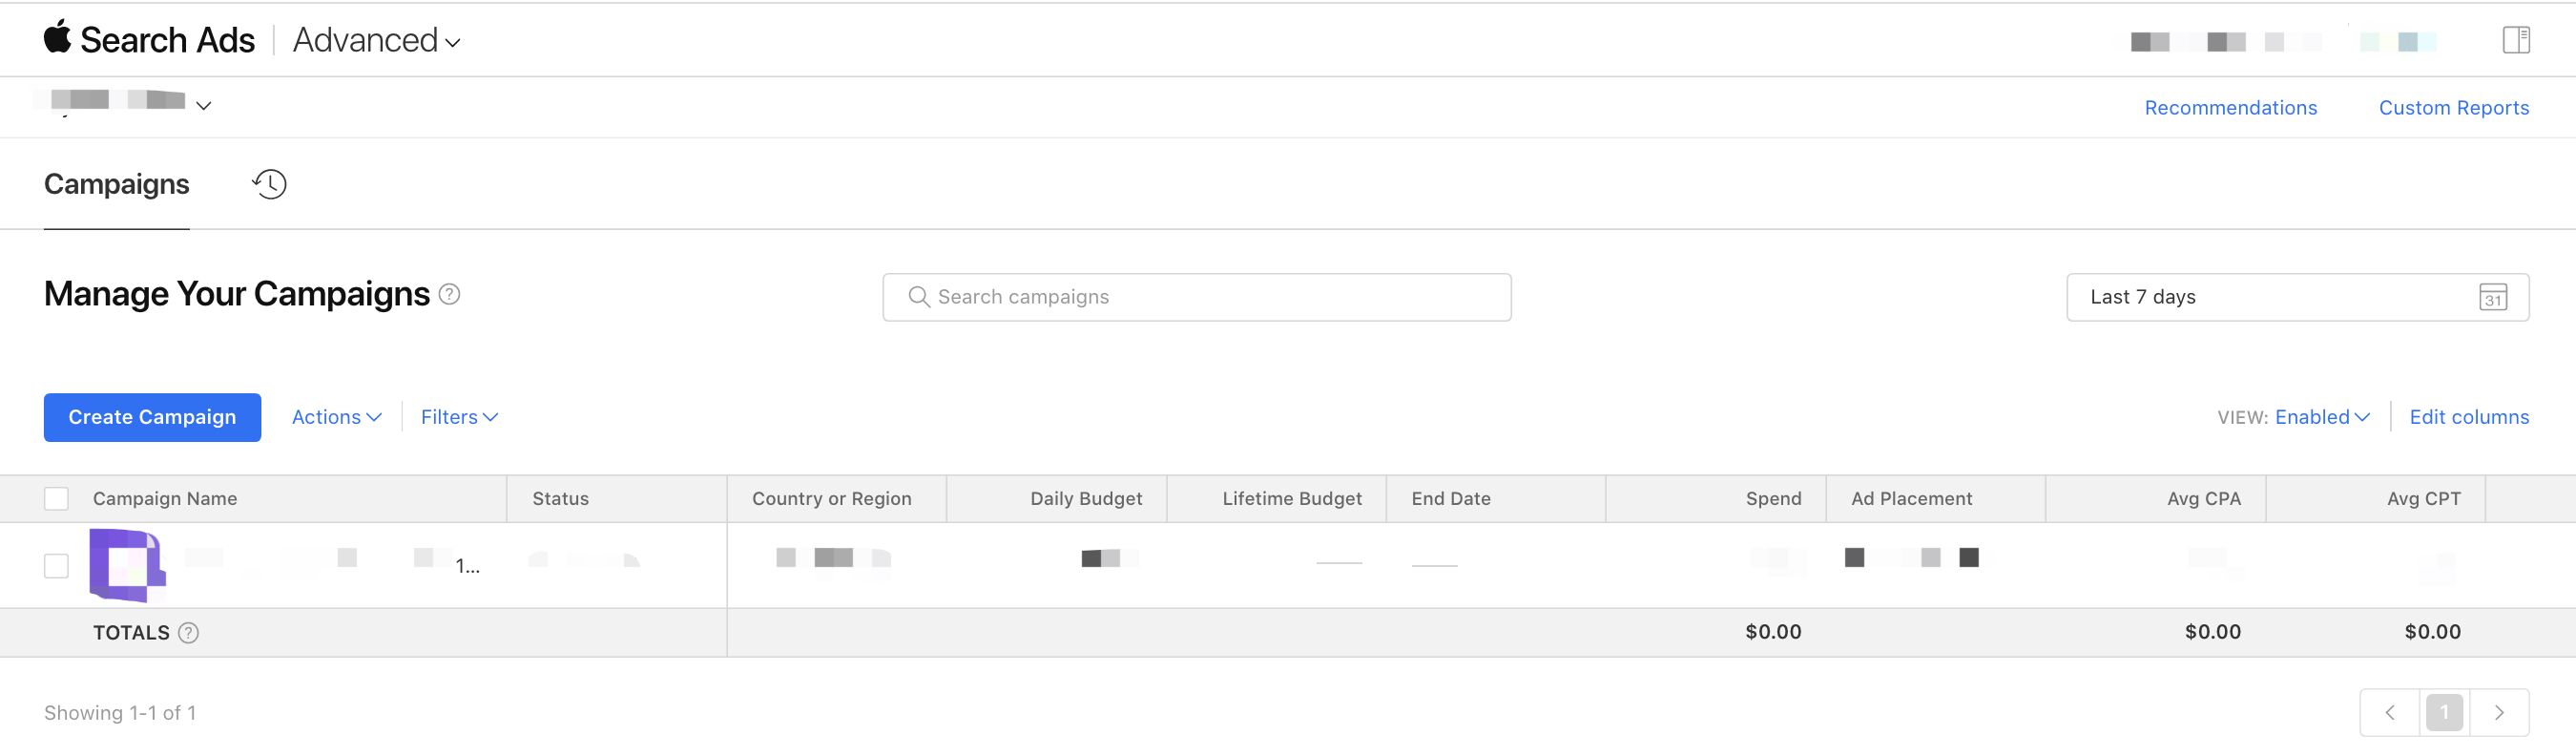
Apple-Search-Ads-dashboard
Step 2: Create a new campaign
After you log in to the dashboard, click the “Create Campaign” button, and you will reach the campaign creation page.
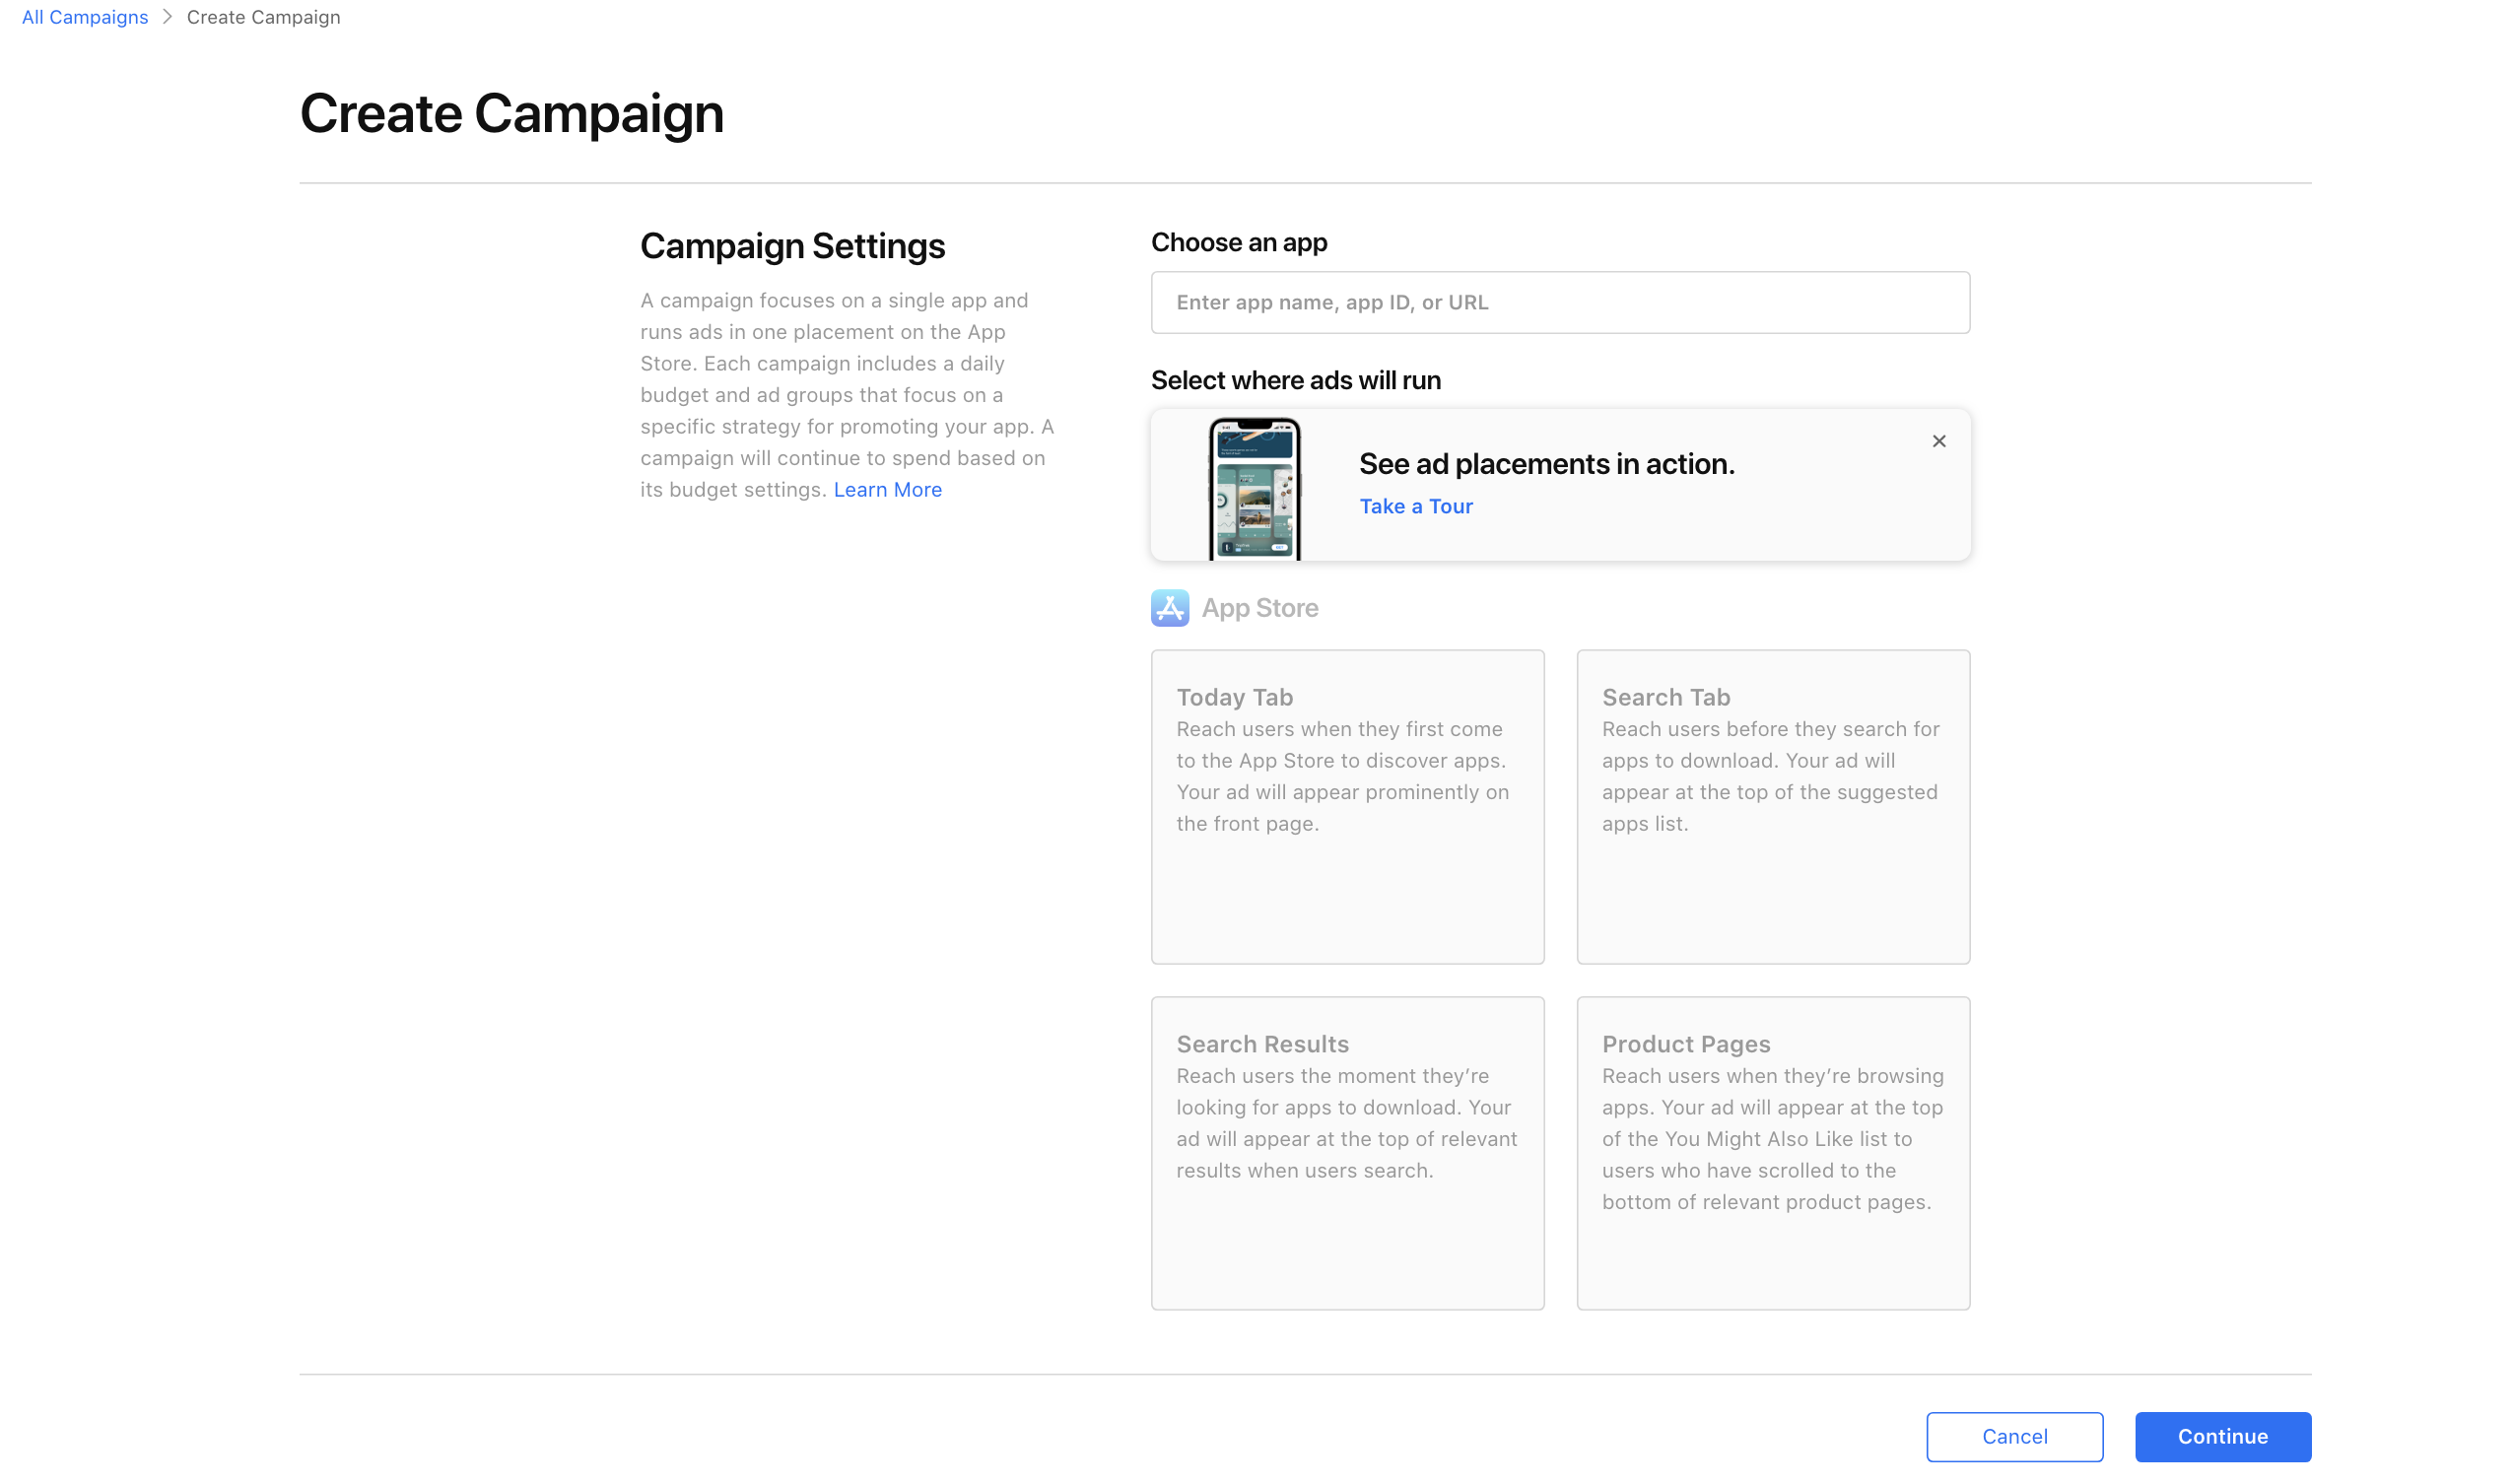
Apple-Search-Ads-Advanced-create-campaigns
Step 3: Choose the app you want to promote
Step 4: Choose where to display your ads
You can promote your app on the Today tab, on the Search tab at the top of the suggested apps list, at the top of App Store search results, or across product pages when users browse apps. (Note that only search results ads are available in mainland China)
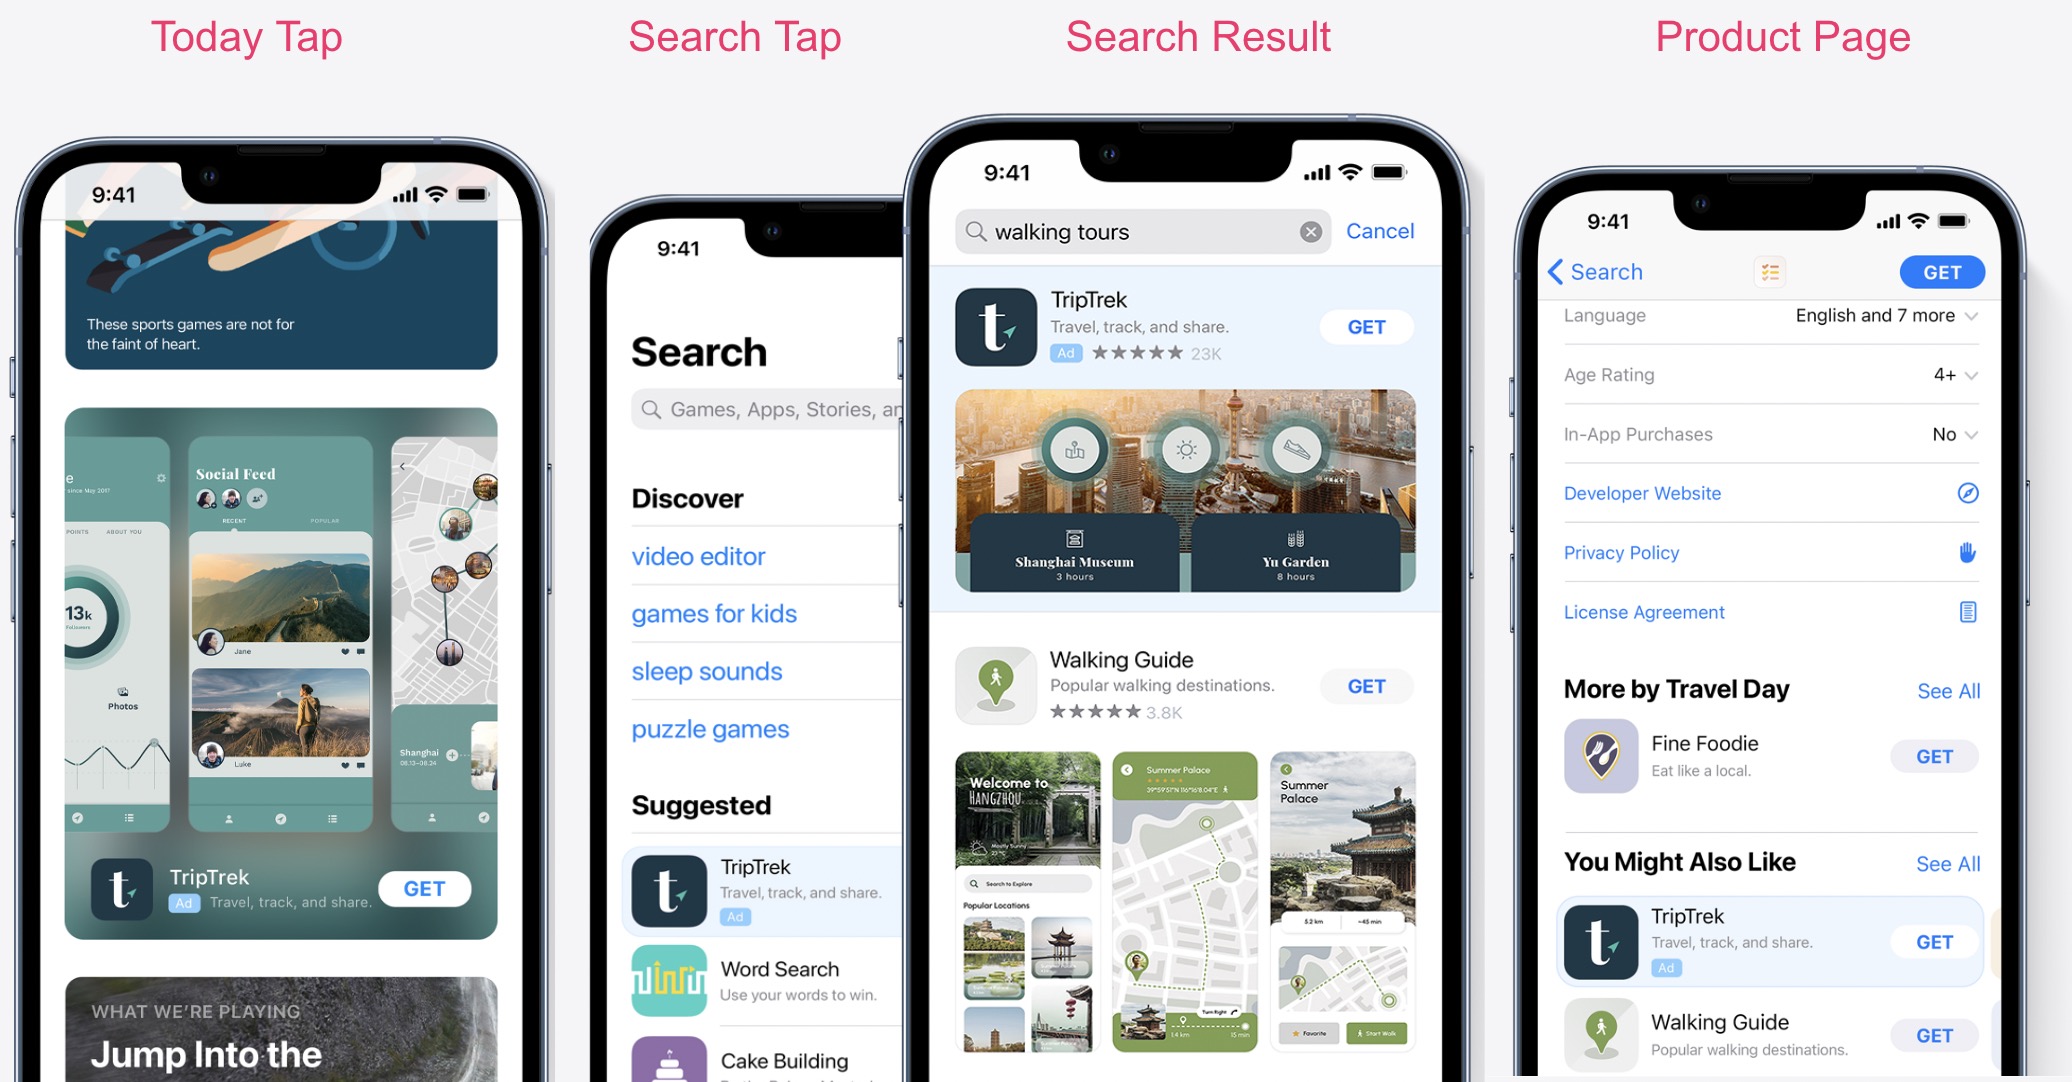
(Apple-search-ads-placements-Source: Apple)
Step 5: Select where your campaign will run
Choose countries and regions to advertise your apps from the list of countries where Apple Search Ads are available.
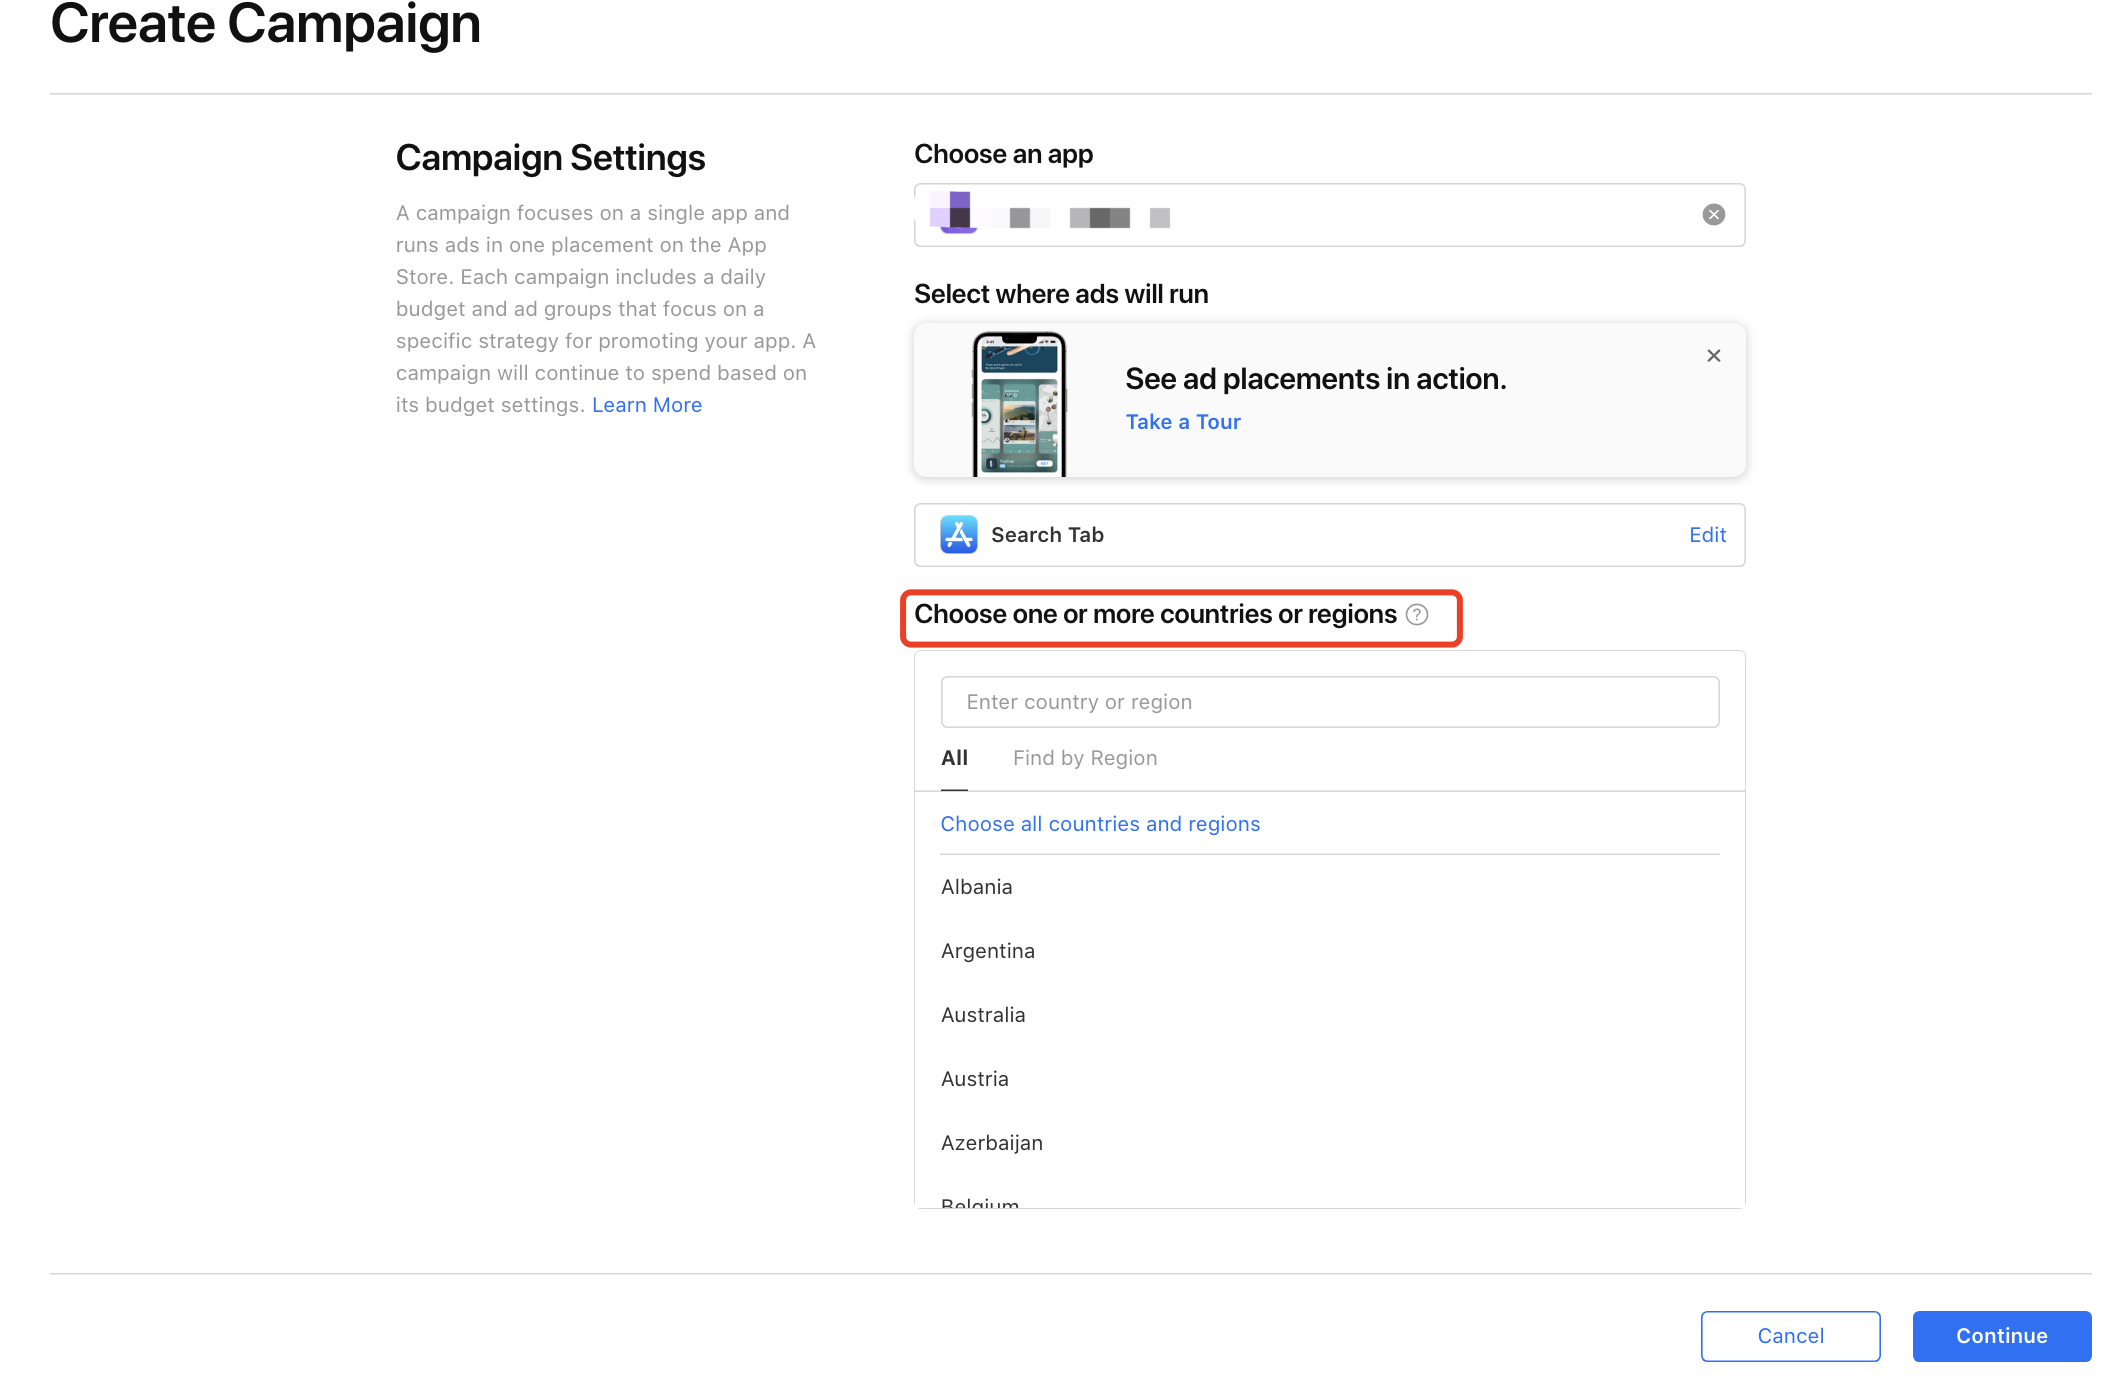
Apple-Search-Ads-create-campaign-choose-where-your-campaign-runs
Step 6: Click the “Continue” button
Step 7: Set up campaign basic information
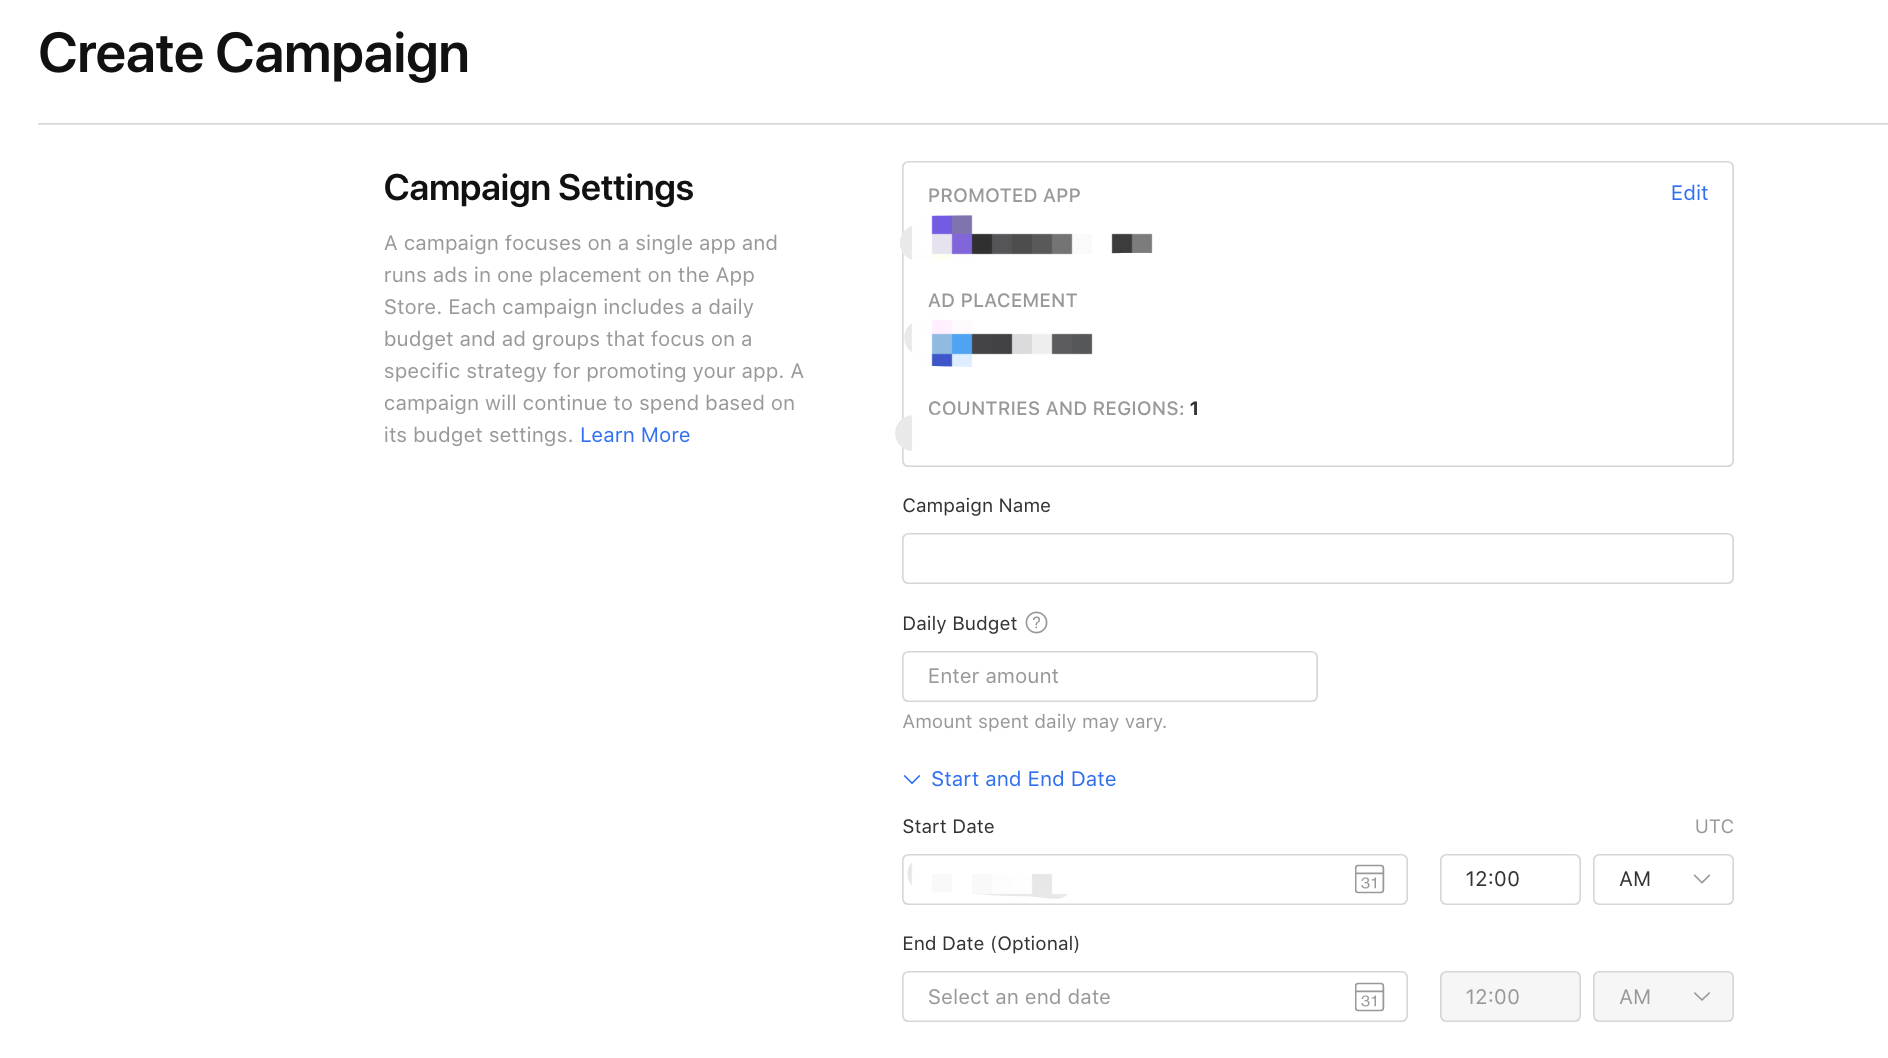
Apple-Search-Ads-campaign-basic-info-setting
- Enter a campaign name: You can name your campaign with ads placement, campaign categories, ad variations, or anything that helps you recognize them easily.
- Define a daily budget: This daily budget is the average amount you want to spend on the campaign every day over the period of one month. (Your monthly spending will not exceed the max daily budget you set times 30.4—the average number of days in a calendar month).
- Schedule the campaign: You can choose to start your campaign right away when it is created or set the start date and end date when you want to promote your apps. You can change this setting anytime you want. So no worry about it.
Step 8: Set up an ad group
A campaign can consist of one or more groups. The ad group setting varies depending on the ad placement you choose.
You need only to set up bids and audience in the Today tab, Search tab and product pages. For ads displayed on Search Results, you need to set up bids, audiences, keywords, negative keywords and ad variations.
Wherever you place your ads, here are things you need to set up:
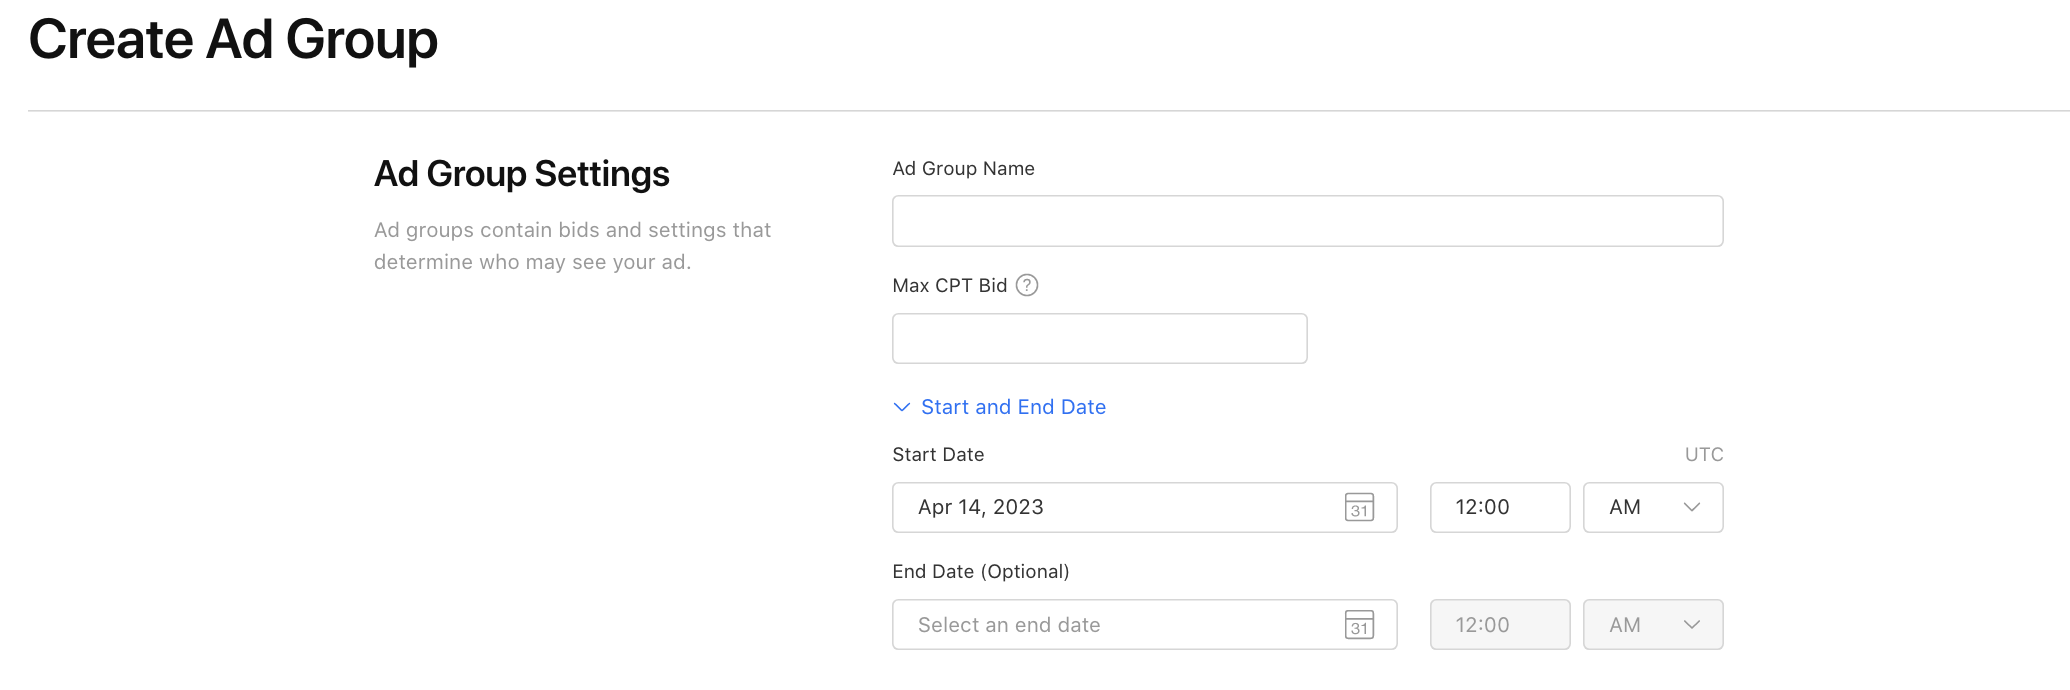
Apple-Search-Ads-create-ad-group
- Name the ad group: You can name your group with terms associated, like campaign types, keywords, or audiences. You should make the name easy to recognize.
- Set up a maximum cost-per-tap(max CPT): The max CPT is the maximum amount of money you are willing to pay for a tap on your ad.
Note: For Search Results ads, the same bid you set here will be applicable across all the keywords, unless you define a different bid at the keyword level. - Schedule the ads: Set a start date for your ad group to run and optionally the end date.
After setting up the above sections, the following steps are needed depending on the ads placement you choose:
For Search Result campaigns, you also have to set up the following sections:
- Add cost-per-acquisition (CPA) goal, this is your ideal amount of money you want to spend for acquiring one user. Note that this is not complimentary, so it is fine that you did not set this up.
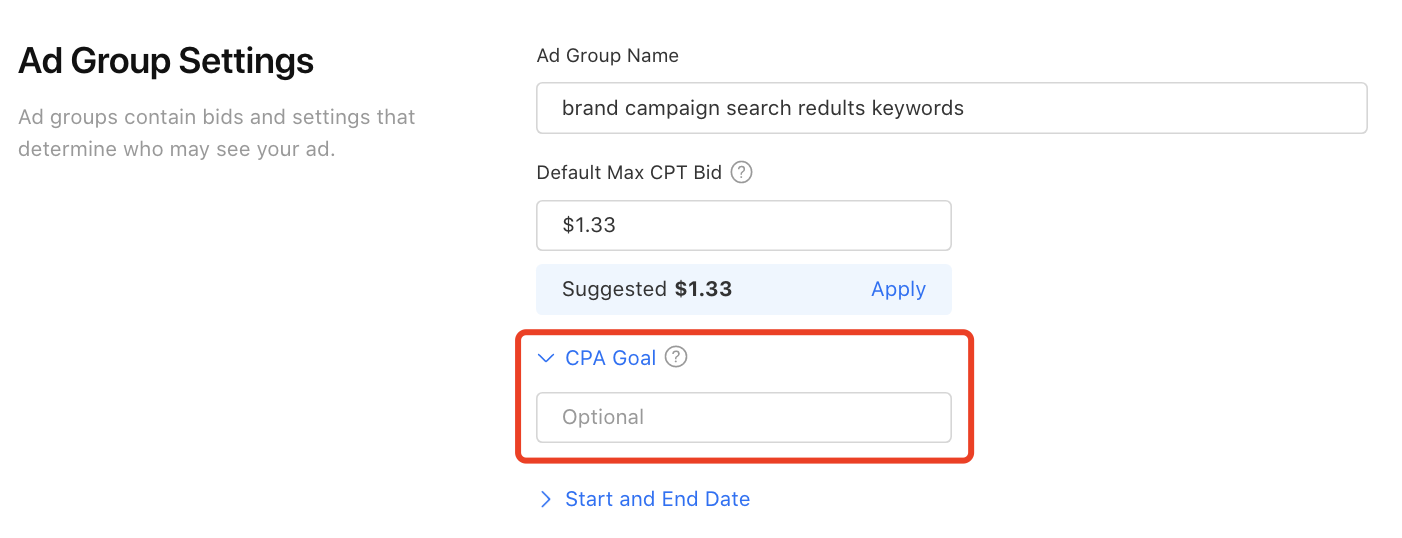
Apple-Search-Ads-CPA-goal
- Decide whether you want to turn the Search Match on or off.
Note: Search Match is a default feature that helps match your ads automatically to search terms without defining the keyword.
You can create an ad group in the Discovery campaign with the Search March on and don’t include any keywords. This can help you discover more potential keywords. For other ad groups, it is suggested that you turn the Search Match off.
Apple-Search-Ads-search-match
- Define the ad group keywords. You should choose the keywords that are related to the campaign you focus on.

Apple-Search-Ads-add-keywords
For example, if you are creating a Brand campaign, then the keywords should be matched to your brand and the match type should be “Exact Match”. Also adding negative keywords to the ads group can help eliminate users that are not expected.
For the Product Pages campaign, you can choose which app categories to your ads. You can either choose to run your ads across all the app categories or select the app categories your own app lies in.
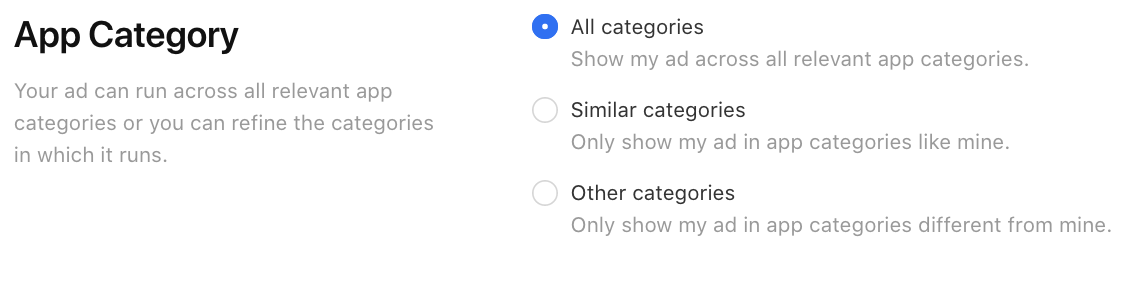
Apple-Search-Ads-Advanced-product-page-campaign-choose-app-categories
Step 9: Choose your audience
You can show your ads to all eligible users. Or you can define your ad's audiences by setting the audience modifications: users’ device types, customer types, customer types (gender and age), demographics and locations.
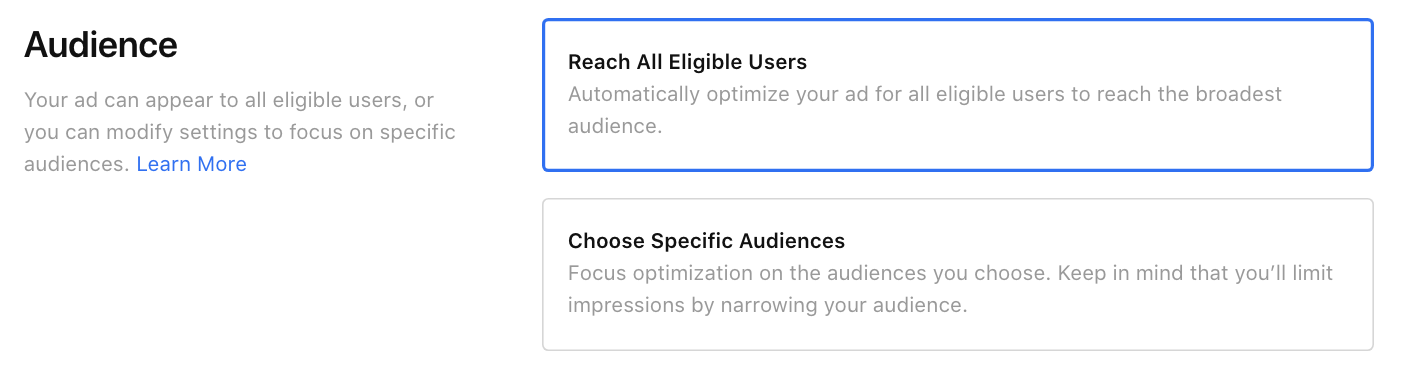
Apple-Search-Ads-Advanced-choose-audience
After setting up the above sections, the following steps are needed depending on the ads placement you choose:
- For the Today tab campaign, you need to assign a custom product page approved by App Store Connect.
- For the Search Result campaign, you can choose the default product page or the custom ones you set up in App Store Connect.

Apple-Search-Ads-Advanced-Ad-Creative
Note: for the Search tab and Product page campaign, the ads are created using the assets you’ve already uploaded to your App Store product page, and feature your app name, icon, and subtitle. So you don’t need to do custom settings.
Step 10: Finish creating
Click the “Create Campaign button” and the first Apple Search Ads campaign is created.
Well, that’s it. Now you have already created the Apple Search Ads campaign and it is running right away.
So what you should do next? Well, after your ads start running, you should monitor the performance of your ads and make optimizations, so you can make the best out of Apple Search Ads and achieve a positive ROI as soon as possible.
Now let's see how Apple helps you track the ads performance.
Apple Search Ads Advanced Report
In the Apple Search Ads dashboard, you have the access to these important metrics(which I just move from the official document to ensure accuracy):
- Average CPA: CPA represents the cost-per-acquisition. It is the total spend divided by the number of installs in a certain time period.
- Average CPT: CPT represents the cost-per-tap. It is the average amount you’ve paid for a tap on your ad.
- Average CPM: Average cost-per-thousand-impressions (CPM) is the average amount you pay per one thousand ad impressions on the App Store.
- Average Daily Spend: The average amount of money you spent every day. It is calculated by Spend in a certain time frame divided by the number of days selected when the ads are running.
- CR: CR means Conversion Rate. It is the total number of installs received within a period divided by the total number of taps within the same period.
- Impressions: The number of times your ad appeared on the App Store within the reporting time period.
- Installs: The total number of conversions from new downloads and redownloads resulting from an ad within the reporting period.
- Match Source: This identifies whether your impression was the result of a Search Match or a bidded keyword
- New Downloads: These represent app downloads from new users who have never before downloaded your app.
- Redownloads: Redownloads occurs when a user downloads your app, deletes it, and downloads the same app again following a tap on an ad on the App Store, or downloads the same app on an additional device.
- Search Popularity: The popularity of a keyword, based on App Store searches. Search popularity is displayed as numbers from 1 to 5, with 5 being the most popular.
- Search Term: Search terms are keywords and phrases that people have used to find the particular type of app they’re looking for.
- Spend: The sum of the cost of each customer tap on your ad over the period of time set for your reporting.
- Taps: The number of times your ad was tapped by users within the reporting time period.
- TTR: The tap-through rate (TTR) is the number of times your ad was tapped by customers divided by the total impressions your ad received.
These metrics Apple offers can help you understand your ads performance greatly. And in a way, you can use these data insights to optimize your ads—adjust your keyword strategies and bid, achieving higher impressions and installs.
Pro tips: Tracking Post-install Events for Apple Search Ads Advanced
Although Apple’s report can help in some way, it does not provide insight into what happens after users install your app.
I mean: how do you know the ads are bringing true value to you? What is the lifetime value of your acquired users? For example, if you are running a subscription-based app, how do you know your installs are leading to subscriptions? Or say how you can adjust your ads strategies to get the true value(revenue) out of it?
Apple does offer an insightful suggestion to solve this issue——monitor post-install events and measure the performance of your campaign by integrating with a mobile measurement provider(MMP).
What is Mobile Measurement Provider(MMP)?
Mobile measurement providers are companies that often offer third-party data tools to attribute, collect, and organize app data. They often bring all the data together in one dashboard to show a unified overview of how a brand’s campaign performs.
As it is said by Apple: “MMPs interact with various marketing channels independently to count app downloads and monitor post-install events. If you permit an MMP to access your Apple Search Ads campaign data through the Apple Ads Attribution API, they can incorporate that data into their solution.”
Appflow.ai——the Best Free MMP for Subscription Apps
Appflow.ai is a subscription analytics platform that helps mobile apps to build, manage, analyze and grow their in-app subscriptions. It is the best free mobile measurement provider for subscription apps to track and analyze real-time subscription data.
One of the outstanding features of Appflow.ai is Funnel Analysis. Integrated with Apple Search Ads, it can help track the post-install events and measure the true value of users from a specific channel, like Apple Search Ads.
Note: You can also integrate with Adjust to get all the subscription data from all your marketing channels.
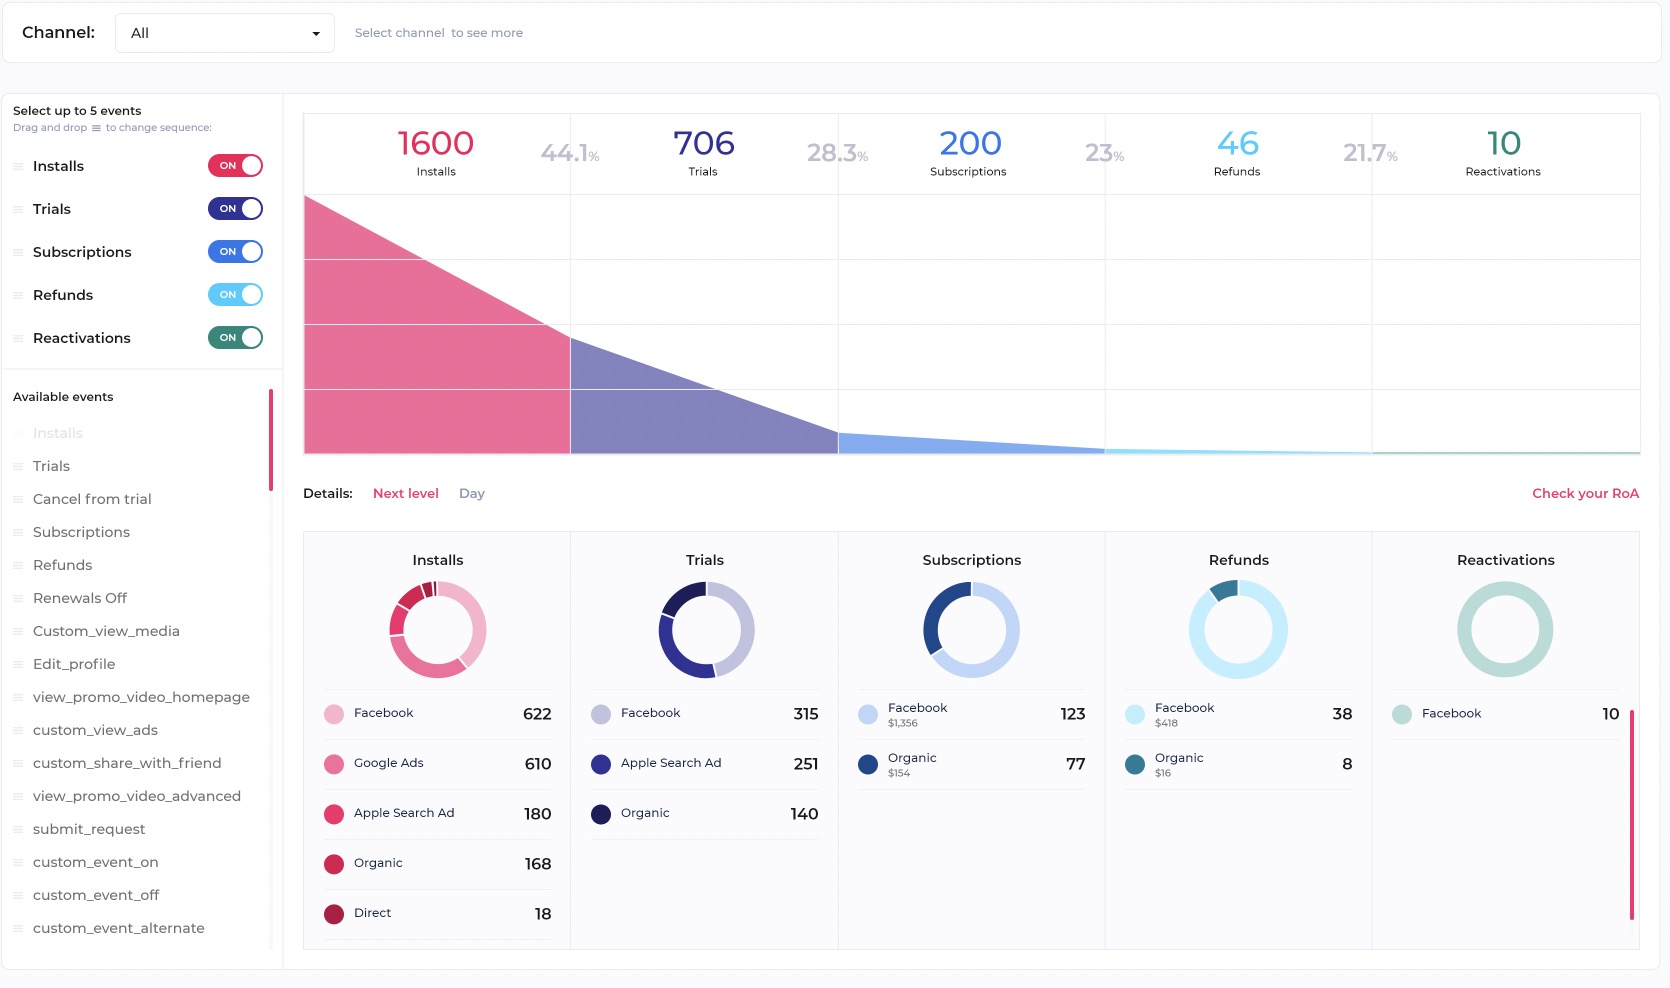
Funnel analysis at Appflow.ai is very easy to use. After integrating with Apple Search Ads, Appflow.ai will start tracking the post-install events (the default events are: installs>trials>subscriptions>refunds>reactivations). You can also send custom events to Appflow.ai and customize the funnel yourself with drags and drops.
Once the SDK is set, you can analyze Apple Search Ads post-install events at the level of ads campaigns, ads groups, and keywords. You need just to select from the filter. The funnel will present to you immediately. You can start gaining in-depth insight right away.
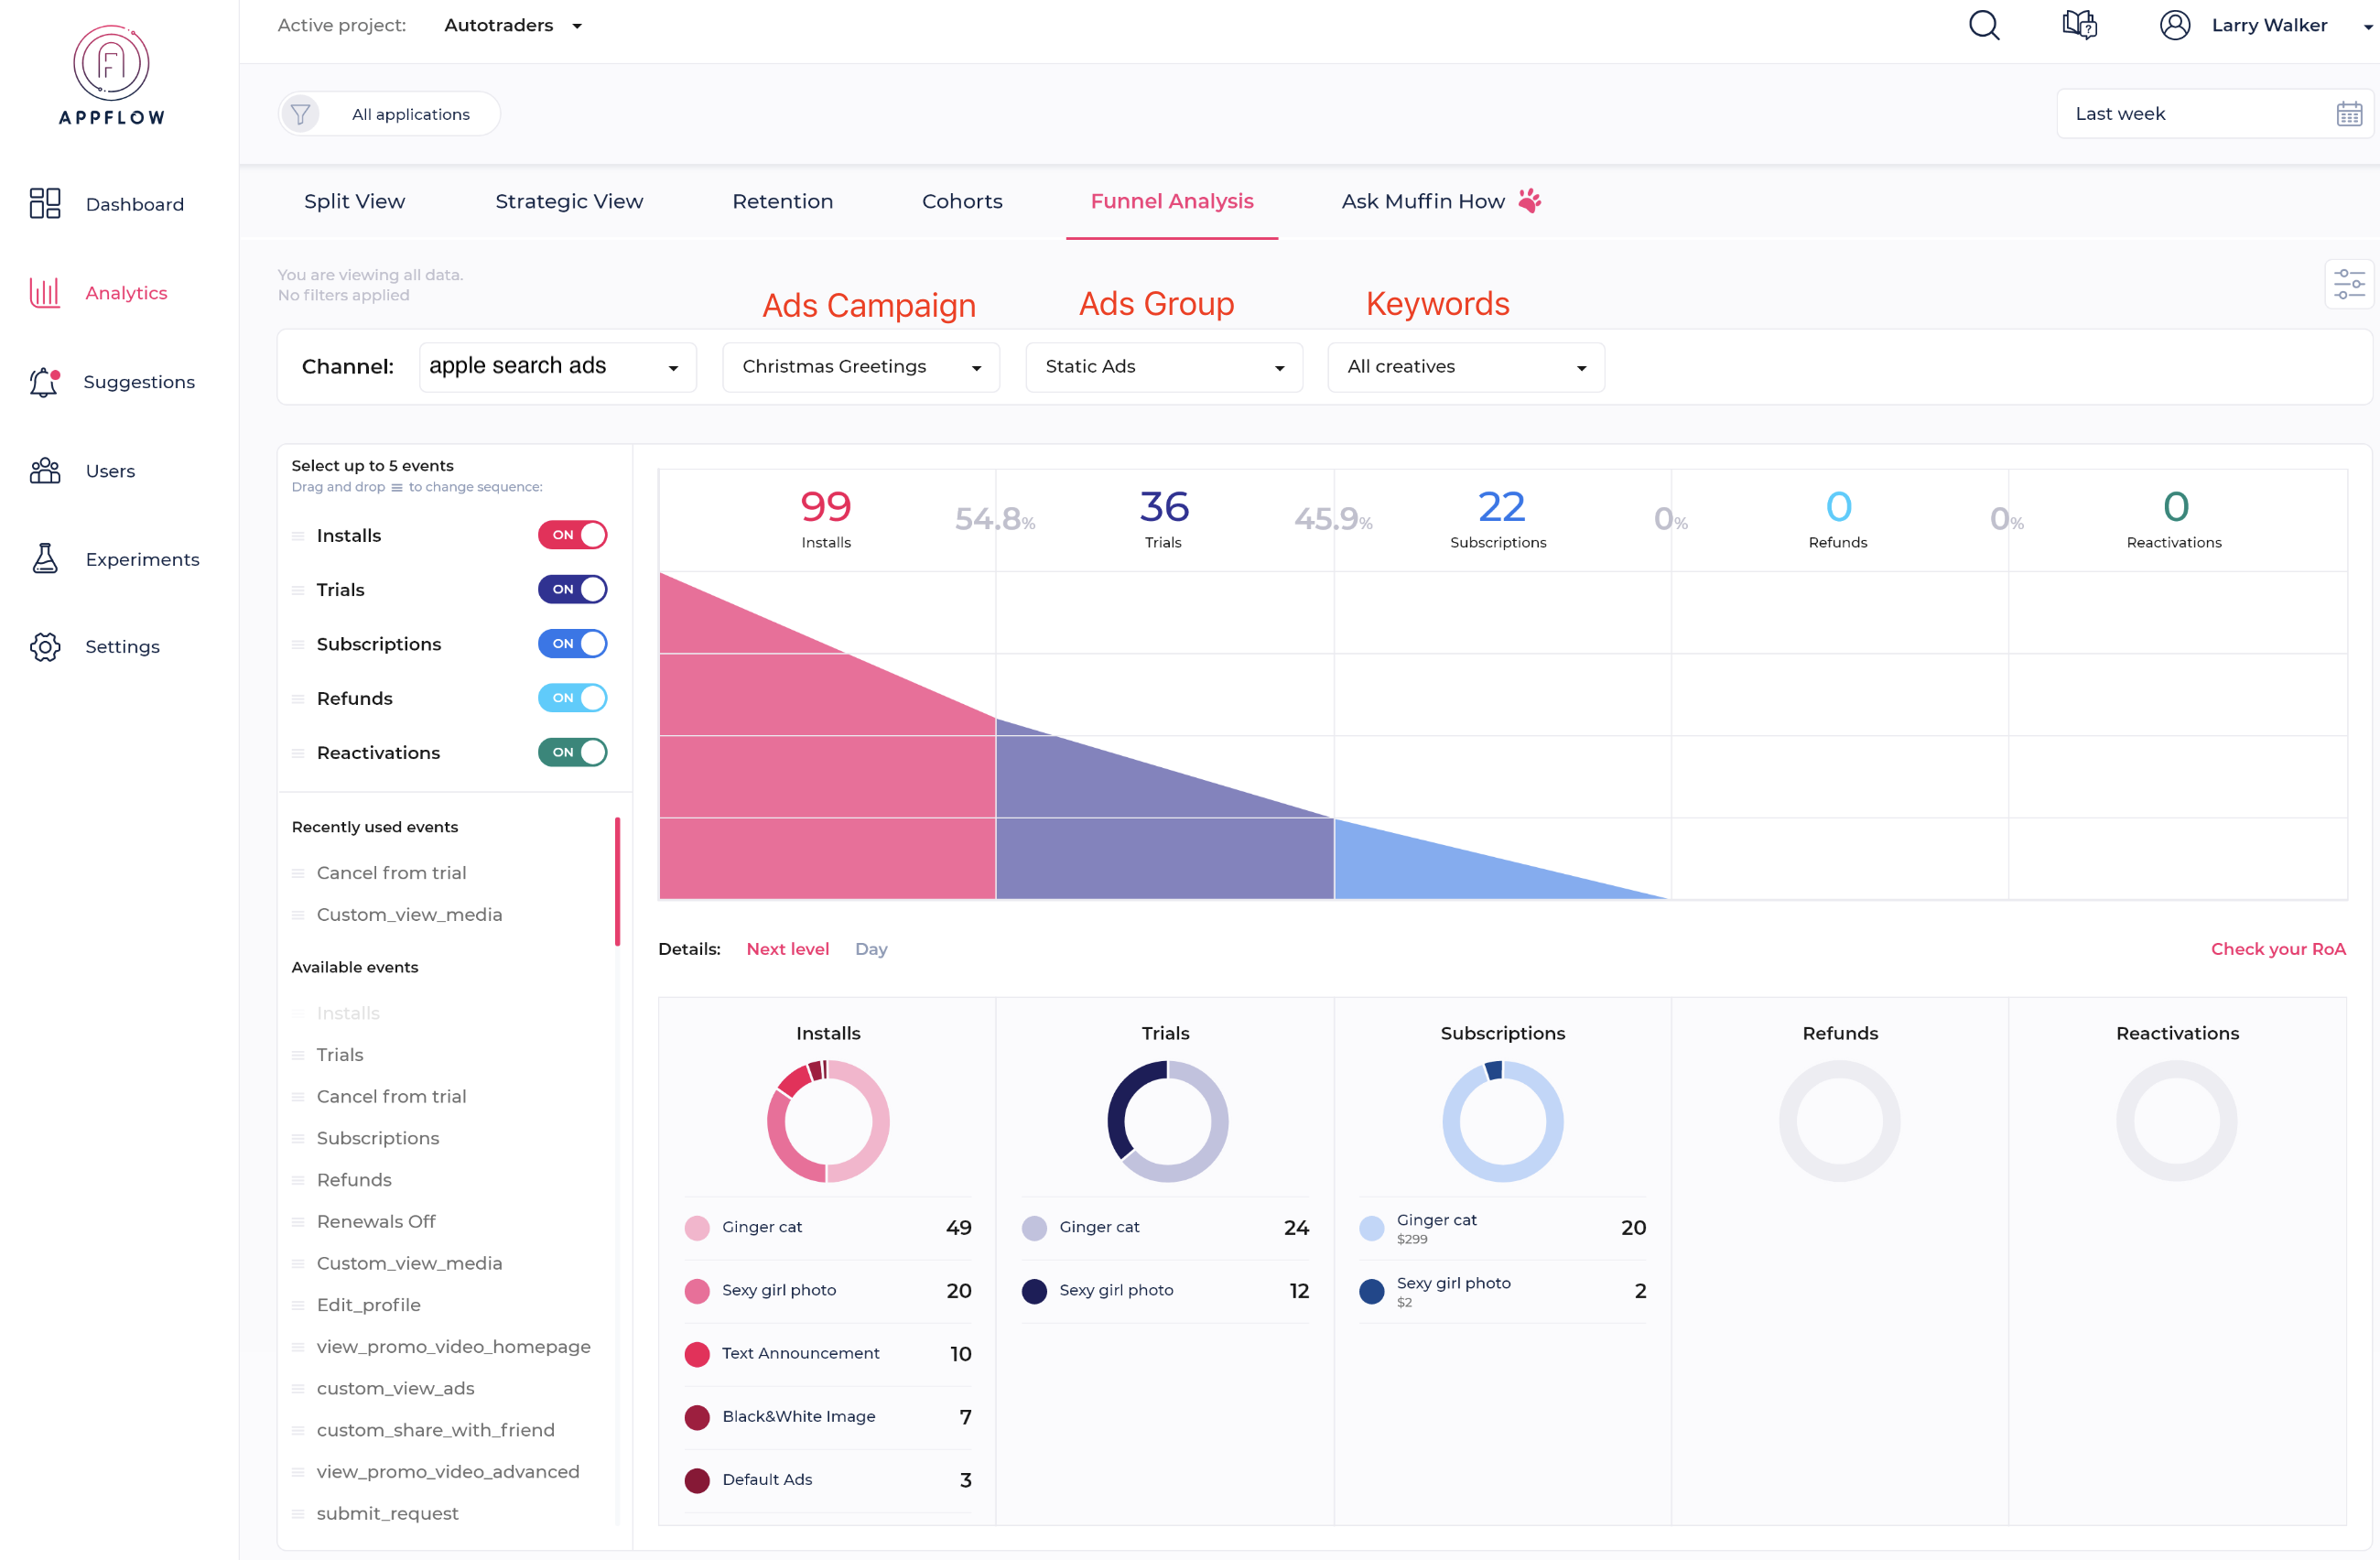
funnel-analysis(source: Appflow.ai)
Note: Appflow.ai’s funnel analysis is free up to $10k/MTR. Create a free account (no credit card required) and start tracking post-install events right away.
Conclusion
Apple Search Ads is a powerful marketing channel to promote your apps and bring value to your app business. After setting the campaign up, you should also keep track of the performance of your ads using Apple’s reports or using an MMP, like appflow.ai for subscription apps, to better understand the post-install events and the true value the ads are bringing. These data insights can help with ads optimization and ensure that you are making the best out of your ads.
Apple Search Ads Set-up Tutorial 2023


